Getting Started with Git
To get started, please make sure that your have Git installed on your computer.
Instructions for installing Git on Linux, Windows and mac machines are available here.
Once the installation is complete, go to your project directory via terminal or command-line interface (for example, cd my-project-folder).
Your project folder contains all of your files including subdirectories.
When working on a project you will make numerous changes to your files as you progress.
Sometimes you may need to undo changes, take another look at past versions, or compare versions.
Saving each version individually (such as version_1.py and version_2.py) is messy and quickly becomes impractical.
Commits serve as checkpoints where individual files or an entire project can be safely reverted to when necessary. By making commits you can save versions of your code and switch between them/compare them easily without cluttering up your directory.
To get started with your Git repository, run the following Git command in the terminal to create/initialise your Git repository:
git init
This only needs to be done once per project.
Think of the repository as a place where the history is being stored.
When you first initialise a repository with git init all of your files in your project would not be added to the Git repository as they are by default untracked by Git.
Therefore your next step is to add your files to the Git repository and allow Git to track them.
Run the following command to add all files in the current folder:
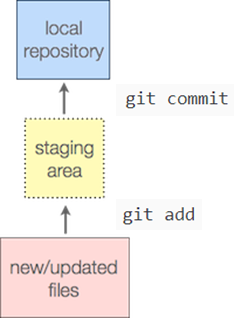
git add .
OR run the following command to add only the files (‘your_file_name’ in this example):
git add your_file_name
This command puts your newly added files or any other changes into what is called the “staging” state.
If you are ever unsure what files have been added, what files have been changed, what files are untracked, you can run the following to find out:
git status
The next step is to “commit” any changes stored in your staging area so that they are recorded in your repository.
git commit
Congratulations, you have finished setting up your repository!
You will learn more about git commit in the next chapter.