Continuous integration with Travis
Overview of Travis
In this chapter we will focus on Travis because it’s free (if your code is openly available), widely used, and well integrated with the version control platform GitHub.
To use Travis you will need to add a file to your project called .travis.yml which describes the computational environment to run the project in, and includes a script to run your tests. See the chapter on reproducible computational environments for more information on them, including writing .yml files to specify them. See the chapter on testing for information on writing and automating tests. The .travis.yml file has a number of other capabilities, which will be described later along with more detailed instructions for writing these files.
Once Travis has been set up on a project then each time a commit is made it:
Clones a copy of project
Generates a copy of the computational environment specified in the
.travis.ymlfile in a brand new virtual environmentBuilds the project within that environment
Runs the tests by following the script specified in the
.travis.ymlfileReports the results
Travis will output the results of every step of building the environment and running the script as a log viewable in your account on the Travis site (the dark grey box in the figure below).
Travis will attach a badge to the results, green if all steps in the script (which run the tests) pass, red if not. The badge will be yellow whilst Travis is still running. If Travis is unable to generate the computational environment described in the
.travis.ymlfile then it will not proceed further and the badge will be grey. See the figures below which show the passing build badge and failing build badge in the readme of a GitHub repository.Travis will also report the results via email (notification settings can be adjusted).
Here’s what the Travis dashboard of a repository looks like:
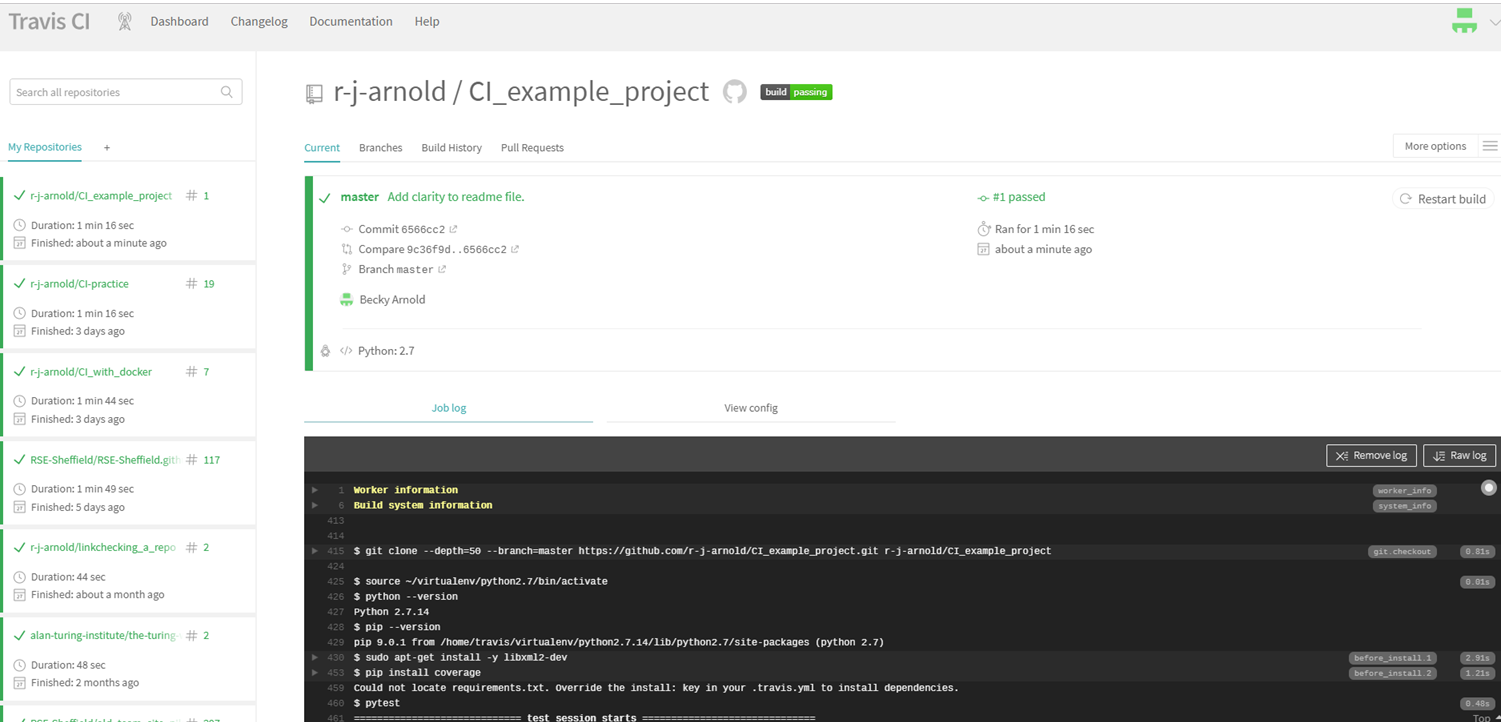
Everything’s green because the build is passing. Note the “build passing” badge at the top. If you click that you will get a popup with a dropdown menu where you can select a way of copying the badge. If you select “markdown” and copy and paste the code snippet it outputs into a markdown file in the project, then GitHub will display the badge in that file:
![]()
If I deliberately create a bug and commit it then Travis automatically runs, the tests fail, and this badge automatically updates to “build failing”:
![]()
You can use Travis to test your project in multiple computational environments my specifying them in the .travis.yml file. A quick note on Travis vocabulary:
Job - an automated process that clones your repository into a virtual environment and then carries out a series of phases such as compiling your code and running tests. A job fails if the return code of the script encounters an error.
Build - a group of jobs. For example, a build might have two jobs, each of which tests a project with a different version of a programming language. A build finishes when all of its jobs are finished.
Setting up continuous integration with Travis
Basic steps
Write a
.travis.ymlfile and add it to your project.Upload your project to GitHub if you have not already.
Go to Travis-ci.com and Sign up with GitHub.
Accept the Authorization of Travis CI. You’ll be redirected to GitHub.
You will see a list of your GitHub repositories with buttons next to them. Click the button next to your project repository to activate Travis on it.
Check the build status page to see if your build passes or fails, according to the return status of the build command by visiting the Travis CI and selecting your repository.
Next time you commit to your repository Travis will run on the updated version of your project and report the results.
It’s that simple. The rest of this section will describe the different components of the .travis.yml file and how to write them.
Setting up the computational environment
This page on common build problems is a good place to start troubleshooting if your build is broken.
Operating system
Travis CI works with a few different operating systems. In the .travis.yml file define the operating system to run a project on via the os keyword like:
os: linux
or
os: macOS
or
os: windows
It is possible to build and test a project on multiple operating systems and against multiple versions of a programming language. This will be not be discussed here as this presents and extra level of complexity and will not be needed in most cases for research, but it is discussed later.
To specify the distribution of an operating system to run the project with use dist, for example:
os: linux
dist: trusty
Programming language
Specify the programming language to run your project with using the language keyword, and specify which version of the language to use. So for python2.7 this would look like:
language: python
python:
- "2.7"
Further information on the programming languages that are compatible with Travis can be found here
Compilers
If a compiled language is being used which compiler to run can be specified with the compiler keyword:
compiler:
  - gcc
Dependencies
Not all languages/software are available on all operating systems however they can typically be installed within the .travis.yml file.
To install packages that are not included in the standard version of the operating system specified you can include a before_install step in your .travis.yml along with the necessary code to install them, for example:
before_install:
  - sudo apt-get install -y libxml2-dev
Containers
It is possible to use Docker containers (see the reproducible computational environments chapter) to generate the computational environment by pulling and running the image from the .travis.yml file. If you are doing so you should pull or generate the image (preferably pull to save Travis from having to build the image from scratch) in the before_install step (see above section). Then in the .travis.yml file’s script (see the next section) you can run a command to run your tests like:
script:
  - sudo docker run -t image_name command_to_run
So to use pytest to run tests in python files in a container built from an image called a_demo_image
script:
  - sudo docker run -t a_demo_image pytest
If you need to run more than one command in your script then you can include a script file within the container which contains those commands. Then the same process shown above can be used to run it, like:
script:
  - sudo docker run -t a_demo_image ./a_script.sh
See here for more information on this.
The .travis.yml script
Travis will report that the build has failed if any commands in the script section return an error. Technically any commands can be included in the script, but it is mainly used for running tests. A script does not need to be long or complicated, as demonstrated by this example which uses the pytest command to run tests in python scripts:
script:
- pytest
If there are steps that need to be done before a project to be considered to be “fully” working these should also be included in the script too. Lets say some project needs a figure to be converted to a png file for some reason. The script could include
- convert figure_name.jpg figure_name.png
If for any reason this cannot be done an error will be returned and the build will be marked as having failed.
After success
The after success section is much like the script section in that it contains commands to run on the project. The key difference if that the build will not fail if steps in the after success section return errors.
The after success section is run after the script, and can be used to automate steps that need to be taken once a build has passed all the tests. Examples of things that can be automated include automatically merging the new version of the project to the master branch in GitHub. Another example is for the code coverage (see testing chapter) to be automatically measured and reported, as shown here:
language: python
python:
  - "2.7"

before_install:
  - pip install coverage

script:
  - pytest

after_success:
  - coverage run main.py
  - coverage report
Testing a project against multiple versions of a programming language
When a project is expected to be run on systems with different versions of a programming language you can set Travis to run the tests on each of these versions. For example to test on a variety of versions of python:
language: python
python:
  - "2.6"
  - "2.7"
  - "3.2"
  - "3.3"
Testing a project on multiple operating systems
If your code is used on multiple operating systems it should be tested on multiple operating systems. To enable testing on multiple operating systems add multiple entries under the os key in your .travis.yml file, for example:
os:
  - linux
  - osx
When you test your code on multiple operating systems, be aware of differences that can affect your tests, for example not all tools and programming languages are available on all operating systems. This should be taken into account when writing commands for your script file (or other sections of the .travis.yml file). Also file system behaviour may differ between OSs. Your tests may implicitly rely on these behaviours, and could fail because of them. They are different operating systems, after all.
When Travis is running a job it sets the TRAVIS_OS_NAME variable which describes the operating system being tested. You can use this to run commands only on specified operating systems like this:
- if [[ "$TRAVIS_OS_NAME" == "osx" ]]; then command_to_run; fi
It is possible to go further and construct a build matrix to test a the project in a range of computational environments.
Allowing failures
To ignore the results of jobs in certain computational environments you can define rows that are allowed to fail in the build matrix. Do this by adding an allow_failures section to the .travis.yml file. Allowed failures are items in your build matrix that are allowed to fail without causing the entire build to fail. For example to allow the build to pass even if the job(s) using the osx operating system fail you’d add the following to your .travis.yml:
matrix:
  allow_failures:
    - os: osx
This is useful if you ideally want the build to be successful in multiple environments, but not all of them are vital.